Tuesday, February 27, 2007

Cycling Etiquette and Signaling


Cycling Etiquette

  • Obey all traffic signs and signals. This includes traffic lights and stop signs.
    Communicate with your fellow riders, using proper cycling terms, such as “On your left,” “Car back,” etc.
  • Car back ... move to single file on the right hand side of the road or shoulder. Give way to the car... they are bigger than you and they will win.
  • On your left ... allow the person coming up behind you to pass safely within the lane; not crossing over into the other lane. If necessary move to the right.
  • Stay to the right, except to pass. Pass on the left side only. Do not pass on the right.
    Do not cross center line regardless of passing zone.
  • Use proper signals when turning. Make left turns from the center of the road or left turn lane. Cross railroad tracks at right angles.
  • Ride in control of your bike at all times (i.e. being able to stop within a reasonable distance.)
  • Ride defensively, in consideration of your fellow riders.
  • Don't use Aero bars in a group.
  • Point out and call out any road hazards ahead. These include potholes, drain grates, stray animals, opening car doors, sticks or stones, parked cars, etc.
  • Do not overlap wheels. A slight direction change or gust of wind could easily cause you to touch wheels and fall.
  • Pedal down hill when you are at the front of the bunch. Cyclists dislike having to ride under brakes.
  • When climbing hills, avoid following a wheel too closely. Many riders often lose their momentum when rising out of the saddle on a hill which can cause a sudden deceleration. This can often catch a rider who is following too closely, resulting in a fall from a wheel touch.
  • Follow the instructions of Ride Marshals.

    MS 150 Tips - Vocal Warnings
  • Slowing - When someone yells out "Slowing", this means that there is something that is causing the pack to slow down. This can be anything from a light, a slower pack of bikes, a car up ahead. In any event, prepare to slow down. Tap you brakes and repeat the yell "Slowing". This is to indicate to others that you've heard them and you are also slowing. This will also alert those behind you that you are slowing down.
  • Stopping - When someone yells out "Stopping", this means that there is something that is causing the pack to stop. This can be anything from a light, a slower pack of bikes, a stop sign or a car up ahead. In any event, prepare to stop. Tap you brakes and repeat the yell "Stopping". This is to indicate to others that you've heard them and you are also slowing to a stop. This will also alert those behind you that you are slowing to a stop. It's VERY important not to slam on your brakes especially if there are others behind you!!
  • Hold your line - When someone yells, "Hold your line", this means that you need to stay in a straight line as best you can. In most cases, the person yelling this out to you is attempting to pass. If you swing out or if you don't keep your bike steady, you could cause the other bicycler trouble.
  • On your Left - When someone yells, "On your Left", this means that they are passing you on your left. No need to take this personally. Let them pass as they have the right of way. You should never hear "On your Right". That is, a bicycler should never pass on the right. However, there are many bicyclers with varying experience. Be on the look out for those that will pass on your right. If someone does this, kindly remind him or her that they should pass on the left. Also, it is common courtesy to say "Thank You" to the person yelling "on your left". This indicates to them that you've heard them.
  • Car Up - When someone yells, "Car Up", this means that there is a car up front. It is intended to be a verbal caution indicating that a stop may be necessary. If you hear this, repeat the call so that others know that you are aware of the vehicle up front. It is also common courtesy to repeat this so that others behind you also know about the car.
  • Car Back - When someone yells, "Car Back", this means that there is a car up back. It is intended to be a verbal caution indicating that a stop may be necessary. If you hear this, repeat the call so that others know that you are aware of the vehicle is behind you. It is also common courtesy to repeat this so that others behind you also know about the car.

    MS-150 SAG Signal... To signal Support And Gear vehicles follow these three steps:
  • Off Road. Move out of the path of other riders.
  • Off Bike. Stand or sit nearby.
  • Wave Helmet.

Fuel and Fluids

An understanding and application of the basics of eating and drinking before, during and after exercise will greatly help your preparation and ride experience. Riders sometimes don't realize the importance of before and after, and tend to only think in terms of during ride itself.

Here are some of the basics: Some further references are provided later.)
Hydration: (Critical to both cooling as well as nutrient transport)

  • drink often and in small amounts - before you get thirsty
  • drink before, during and after extended exercise
  • too much is as bad as too little (your body can only absorb at a certain rate)

Electrolytes: (As important, though often forgotten piece of the puzzle.)

  • don't rely on sodium (salt) only
  • use electrolyte supplements &/or 'sports drinks'

Fuel: (Provides the calories to keep you going.)

  • avoid simple sugars (They provide fast acting but very short lived impact.)
  • complex carbohydrates provide a sustained energy source
  • use protein supplements

There are LOTS of specialist products available - 'energy bars', gels, power / water mixes

With respect to the above, practice drinking and eating during training rides - don't leave it to the actual event. That way you will get to know what is best for you personally. Experiment a little with different products.

Check out this fueling handbook.

Additional Training

Don't just exercise your legs. Do a little training for upper body strength. This will help avoid fatigue or stiffness in the arms and shoulders.

Mix up your training - add variety - distance, routes, speed, who you ride with......

Pedal circles - i.e. not just push on down stroke. This achieves a smoother smoother action and reduces overall fatigue. It will require practice. Use toe clips or "clipless" pedals to optimize each rotation of the crank.

Take a break when you need to. Don't overdo it - especially in the early part of your training. Even a short break of five minutes will revitalize you.

Use a mirror to see behind. This helps know what is coming up behind you and hence adds to your safety. Mirrors can be attached to the helmet or handlebars. Get into the habit of looking in your mirror &/or over your shoulder regularly and especially when changing direction or position on the road.

Be sure your bike is the correct size and that it is adjusted to fit your body. This is especially important for longer rides - you can get away with a not so good fit for just and hour or so. Correct set up will greatly help both your comfort and efficiency. Consult experienced riders if you are not sure.

Use a bicycle computer. They are inexpensive and help develop an understanding of your capabilities and keep track of your improvement. It is helpful to keep records in a log.

Frequency - you should ride no more than 6 days a week. You will need at least one day a week to recover.

ALWAYS WEAR A HELMET - every time you go out. Make sure it fits you properly and is in excellent condition - no damage, frayed straps, buckles/clips work correctly etc....

Training Schedule

The training plan below is listed in miles per day, and was adapted from a century training schedule from Bicycling Magazine. It is based on the target of completing the MS150 at the end of 10 weeks of training. One modification you might make is to increase the mileage on Sunday, to get used to doing 2 consecutive long days. 1) Take a rest day—here it is on Thursday, but you can adjust to meet your personal schedule. 2) Try to ride most days of the week - especially getting closer to the ride date. 3) Don’t increase your weekly total more than 10-12%. To do so risks injury. 4) “EASY” means relax. This is a recovery period for your body. 5) “BRISK” means 2-3 miles per hour faster than your target speed for the ride 6) “PACE” means your target speed for the day of the MS150 7) The big mileage days on Saturday are critical to the program. It doesn’t have to be on Saturday, but they should be more than 4 days apart, and once a week. Program to help you ''comfortably' complete the MS150


More Training Tips
Intensity: Alternate hard days with easy days. Allow your body to recover from the hard efforts. On hard days you may only ride half the distance you would ride on an easy day. Alternating intensity not only allows you to be able to sustain hard efforts (like riding all day into a headwind), but also changes the monotony of riding the same speed/distance day in and day out.

Warm-up: Use the first few miles of every ride as a warm-up. Especially when it’s cool out, this will minimize the chances of injury. Many people make the mistake of pushing too hard early in the season when they are both not in shape and riding in cool/cold weather.

Stretching: Stretching before you ride can prevent injury, while stretching after you ride can aid the recovery process – especially on a two day ride. Stretch until you feel the pull, then back off slightly. Pain while stretching means you are overdoing it. Remember long (at least 30 seconds) and slow.

Find a Buddy or Two: Riding is MUCH more fund with a friend. It also adds to the safety and a buddy will be there to help out if you have a puncture or a mechanical problem.

Clothing: Don't under-dress for cool conditions. Dress in layers. Tendons and ligaments work best when warm. Wear leg warmers until it reaches about 60 F. It may look cool to have bare legs at 55 F, however you run the risk of injury. You can always take off layers if you are too hot, but can’t put them on if you find yourself too cold and didn’t bring them with you.

Bike Preparation

Rule #1: Never, never, never make adjustments to your bike the night before the ride. Give yourself a week to ride the bike after you’ve replaced equipment, adjusted derailleurs, brakes, etc. This is to make sure that everything is working as it should .....and nothing falls off!

Tires - Be sure your tires and tubes are in good shape, and fully inflated. Under inflated tires create more rolling resistance, causing you to work harder. Replace tires that show signs of deteriorating rubber or large cuts. Tires can fail catastrophically ...and with significant consequences! If you have off-road tires, consider replacing them with "slicks" as this will greatly reduce rolling resistance. Have with you a couple spare tubes, a patch kit, a pump or CO2 cartridges, and tire "irons", so you can fix a flat. There are bike mechanics at some of the rest stops, and SAG wagons patrolling the route, but if you get a flat, you'll be glad you can fix it yourself.

Derailleurs/Shifters - Be sure your derailleurs are properly adjusted, operate smoothly, and that the cables are not frayed. Lubricate the derailleurs and cables.

Chain - Clean and lubricate your chain the week before the MS150. With all the training miles you've ridden, your chain has picked up some grit, a little effort in cleaning and lubricating your chain will give you a smoother (and quieter) ride. Better yet, if you can't remember the last time you cleaned your chain, it's probably time to replace it - you might be surprised to find out a new chain only costs only $10-$25 and will reduce the wear on your cassette.

Wheels - Check that your spokes are tight, and that your wheels are "true". If your brakes rub intermittently, that's a good sign you've got a wobble. If needed, you'll probably want to have a bike shop true your wheels as this is a specialist job.

Brakes - Make sure your brakes operate smoothly and effectively. Check your brake cables and if they're worn, frayed or gritty, replace them. Make sure that your brakes are adjusted so that you can apply lots of breaking force without the brake levers contacting the handlebars.

Pedals - If you use clipless pedals, be sure the cleats on your shoes haven't loosened, and that they are adjusted so your feet are neither slanted inward or outward unnaturally. If you feel like your knees are being forced in or out when you're clipped in, you probably need to adjust the cleats on your shoes. Periodic lubrication will help make them easy to get into and out of. Make sure that the pedal axles are not loose.

Wheel Hubs: If you have unsealed hubs, the front and rear hubs should be repacked yearly. Check to see that there is not excess play in the axles, that the cones on the axles are not pitted, and that the bearings are not worn. If any of the above are true, it’s time to overhaul the hubs.

Cranksets: Not much to do here. Make sure that the chainwheel bolts are on tight and that the teeth of the chainrings are not excessively worn.

Headsets: Make sure they are properly lubricated and adjusted. Replace the headset if you have pitted races.

Bottom brackets: These are typically sealed, so lubrication is not an issue. Make sure that there is not play in the bottom bracket (that it is screwed into the bottom bracket shell securely).

Handlebars and stem: Make sure that these are tight and aligned correctly.

Saddle: If the one you are riding is not comfortable now is the time to find one that fits. Saddle fit is very individual - take your time and seek advise of experienced riders or bike shop professionals. A saddle that fits you is worth its weight in gold. (But remember it does take time for your body to get conditioned to even the best of saddles.)

If you are wondering what a derailleur is or what kind of wheel hubs you have drop me a quick email.

regards,

Miguel

Monday, February 26, 2007

MS 150 2006 a ride to remember

Here are some classic pics from last years' ride

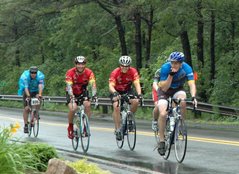
Riding single file to take advantage of the slip stream

It was a little wet so some of the riders used special floatation divices.
Day 2 the team took a nice food break. This is my favorite part of the ride! The guilt free mobile buffet!


Friday, February 23, 2007

Welcome to the team!

Hello everyone and welcome to the official site for PwC MS 150 team. The purpose of this site is to communicate with all team members upcoming events, fund raising progress and logistics.

The annual MS150 Bike Tour is a non-competitive bike ride to raise money for the National MS Society, whose mission is to end the devastating effects of multiple sclerosis. This event is the largest organized cycling event in the United States, with nearly 100,000 cyclists participating in over 100 tours nationwide. The MS150 is suitable for riders of all abilities. Riders pay a modest registration fee, then raise pledges for their efforts.

The goals for this year are:
1. Raise a minimum of $30,000
2. Raise awareness for MS
3. Build a large team (30+ riders) of PwC employees and alumni
4. Get in shape
5. Have a great time doing it all!

As the ground thaws out, we will be headed outdoors to ride our bikes and to do a bit of training. We will also be holding a 2 hr bike safety course taught by one of the GMG tour director to cover safety issues and ride protocol.

Stay tuned,

Miguel Roque
Team PwC Grand Poobah